[FIXED] Aveo 2007 Rough Idle and Low Vacuum
- RH6400
-
 Topic Author
- Offline
- New Member
-

- Posts: 15
- Thank you received: 2
Please Log in or Create an account to join the conversation.
- Tyler
-
- Offline
- Moderator
-

- Full time HACK since 2012
- Posts: 6124
- Thank you received: 1541
Catch the bit as it comes out the other side, or let it go if you've still got the lower timing cover off. :lol: Recheck your marks, and see if you get some respectable vacuum readings.
Please Log in or Create an account to join the conversation.
- RH6400
-
Topic Author
- Offline
- New Member
-
- Posts: 15
- Thank you received: 2
Please Log in or Create an account to join the conversation.
- Tyler
-
- Offline
- Moderator
-
- Full time HACK since 2012
- Posts: 6124
- Thank you received: 1541
RH6400 wrote: I would appreciate the Paint diagram.
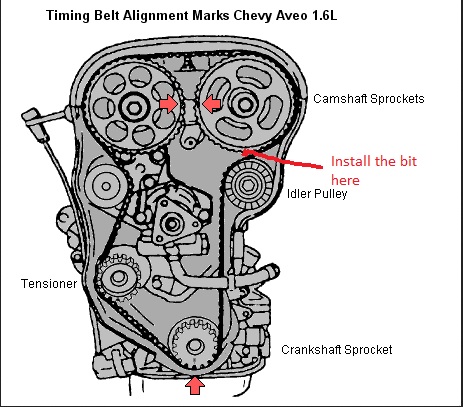
I grabbed a belt diagram off Google, hope it makes sense:
Also, the engine normally rotates clockwise and the repair data warns to only go clockwise and of course I need to go CCW. How risky is going CCW far enough to move it one tooth?
Fair point! Rotating the engine in it's intended direction is safe advice on any overhead cam setup. That said, I've rotated belt setups the wrong way many times, and never caused an issue. Just take it slow keep an eye on the belt as you're doing it.
")
Since we're pretty sure that the belt was never set up correctly in the first place, it may also be worth your time to go back over everything they did. I figured the golf tee thing would work well for proving that it runs well back in time, but it may be worth it to you to take it all apart again anyway.
Please Log in or Create an account to join the conversation.
- RH6400
-
Topic Author
- Offline
- New Member
-
- Posts: 15
- Thank you received: 2
Please Log in or Create an account to join the conversation.
- RH6400
-
Topic Author
- Offline
- New Member
-
- Posts: 15
- Thank you received: 2
I finally got back to the Aveo. Thank you again for the suggestion of the drill bit trick and the clear diagram. The drill bit method did work and allowed me to get the timing marks lined up perfectly. The car runs now with 18" hg vacuum not the 12" hg it had before.. That 18" hg vacuum value is something I have not seen with this car since the first shop changed the timing belt. There is still some work to do since it has been sitting with a dead battery but it's a lot closer to being back on the road.
Please Log in or Create an account to join the conversation.
- Gjauto
-

- Offline
- Senior Member
-

- Posts: 53
- Thank you received: 15
Tyler wrote: Basically, you put a golf tee (or the smooth end of a drill bit, whatever) into a valley of the belt sprocket, and rotate the belt so the drill bit/tee ends up under the belt, and gets dropped out the other side. This ends up making the belt jump a tooth on that sprocket.
You better believe I'm trying that the next timing belt I have to do. genius.
Please Log in or Create an account to join the conversation.
- borntoroll
-
- Offline
- Senior Member
-
- Posts: 74
- Thank you received: 9
Please Log in or Create an account to join the conversation.
- Tyler
-
- Offline
- Moderator
-
- Full time HACK since 2012
- Posts: 6124
- Thank you received: 1541
RH6400 wrote: Hi Tyler,
I finally got back to the Aveo. Thank you again for the suggestion of the drill bit trick and the clear diagram. The drill bit method did work and allowed me to get the timing marks lined up perfectly. The car runs now with 18" hg vacuum not the 12" hg it had before.. That 18" hg vacuum value is something I have not seen with this car since the first shop changed the timing belt. There is still some work to do since it has been sitting with a dead battery but it's a lot closer to being back on the road.
Great to hear!
 Thanks to you for getting back to us - we really appreciate hearing how jobs like this turn out.
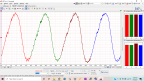
borntoroll wrote: It will be very nice to redo the comparison of peak compression to cylinder spark event.
I'd love to see this, too. Not only for the spark timing, but the shape of the relative compression waveform itself. I thought the humps had a strange shape when I first saw them, and I'm wondering if we can definitely associate that shape with a mechanical timing problem.
Gjauto wrote: You better believe I'm trying that the next timing belt I have to do. genius.
When you get it to work right, it's pretty awesome.
") :lol: Not my original idea, though, got that from someone on iATN.
:lol: Not my original idea, though, got that from someone on iATN. Please Log in or Create an account to join the conversation.