Re:Re:Re:Re:Re:Re:Re:37 year old coil works, new OEM MOPAR won’t
- mmorris923
-
 Topic Author
- Offline
- Junior Member
-

- Posts: 35
- Thank you received: 1
Please Log in or Create an account to join the conversation.
- mmorris923
-
Topic Author
- Offline
- Junior Member
-
- Posts: 35
- Thank you received: 1
Well, I tried testing the 1986 coil and the new OEM with the fuel pump relay pulled to measure the cranking volts in what was said to be an apple to apple test. The battery measured 12.51 volts with my power probe clone.
1986 coil- cranking only 10.60-10.76 volts
2023 new OEM coil- 10.65-10.80 volts
they are virtually the same with one giant problem, now the 1986 coil will not start the engine—we are dead in the water, up the creek without a paddle, at least the Jeep is in our garage and not stranded somewhere on the highway or on the 12 miles of dirt road to the ranch. Our mechanic is out of town this weekend so I’ll have to wait to see what he suggest next… unless someone has an idea on the forum for me to try.
Please Log in or Create an account to join the conversation.
- simclardy
-
- Offline
- Senior Member
-

- Posts: 78
- Thank you received: 7
Sent from my SM-G970U using Tapatalk
Please Log in or Create an account to join the conversation.
- mmorris923
-
Topic Author
- Offline
- Junior Member
-
- Posts: 35
- Thank you received: 1
Please Log in or Create an account to join the conversation.
- simclardy
-
- Offline
- Senior Member
-
- Posts: 78
- Thank you received: 7
Sent from my SM-G970U using Tapatalk
Please Log in or Create an account to join the conversation.
- mmorris923
-
Topic Author
- Offline
- Junior Member
-
- Posts: 35
- Thank you received: 1
Battery showed 12.45 volts on the Power Probe clone.
on the now non-working 1986 coil the OBDII showed a fault code of of P0351 ignition coil A primary/secondary. Read with a basic Autel reader
with the connector on the the coil and a non-LED test light the lamp back-probed and cranking it was lit to equal brightness as the positive battery post. I also measured the cranking volts with Power Probe clone at 10.57 volts (high measurement). I also has a spark tester between the distributor and coil stud, showed no spark. This coil, the 1986 showed spark two days ago and ran the Jeep fine.
Measurements on the new OEM MOPAR coil, OBDII showed no fault codes on this coil! With the wiring harness connector on the coil back-probed, a non-LED test light cranking also lit to equal brightness to the positive battery post. The cranking volts on the Power Probe showed a high measurement of 10.46 volts. I had the spark tester hooked up between distributor and coil stud, also had no spark.
My uniformed observation and question why is the cranking volts less than 10.5 when the battery shows 12.45? Is this indicative of anything?
Please Log in or Create an account to join the conversation.
- simclardy
-
- Offline
- Senior Member
-
- Posts: 78
- Thank you received: 7
Is the test light blinking? Ar you going from primary 1 to primary 2 or from ground to positive? If you are go from positive to the ground on the coil. This is your control wire. You need to find out if you have a good control.
Sent from my SM-G970U using Tapatalk
Please Log in or Create an account to join the conversation.
- mmorris923
-
Topic Author
- Offline
- Junior Member
-
- Posts: 35
- Thank you received: 1
To measure the C2 pin I followed instructions to insert a fine wire in the C2 slot of the relay with the relay then re-inserted and the short length of wire sticking out so I could measure the voltage with a digital meter. I’m not sure if this is following your comment or not, but that’s what I’ done for the measurements I got for the cranking volts on the coil as well as the ASD C2 pin volts.
I’m sure you can tell I’m out of my element on this situation but I’m trying to follow suggestions to understand and hopefully find a solution. I really appreciate every suggestion and instructions as what to do in trying to understand and hopefully find a solution as to why the engine is not running. It did run off the 1986 coil for a total 45 days before it stopped a couple of days ago. That was the original mystery behind this thread why the 1986 coil worked and the OEM MOPAR wouldn’t. Thanks again for your time and ideas.
Please Log in or Create an account to join the conversation.
- simclardy
-
- Offline
- Senior Member
-
- Posts: 78
- Thank you received: 7
Sent from my SM-G970U using Tapatalk
Please Log in or Create an account to join the conversation.
- mmorris923
-
Topic Author
- Offline
- Junior Member
-
- Posts: 35
- Thank you received: 1
Please Log in or Create an account to join the conversation.
- mmorris923
-
Topic Author
- Offline
- Junior Member
-
- Posts: 35
- Thank you received: 1
Please Log in or Create an account to join the conversation.
- simclardy
-
- Offline
- Senior Member
-
- Posts: 78
- Thank you received: 7
Sent from my SM-G970U using Tapatalk
Please Log in or Create an account to join the conversation.
- mmorris923
-
Topic Author
- Offline
- Junior Member
-
- Posts: 35
- Thank you received: 1
I didn’t use the spark checker for this, I just back-probed pin#2 and connected the non-LED test light to the positive battery post.. All plug wires and distributor to coil were in the normal position with no spark tester connected. I am not running the 1986 coil at this time. I have the new OEM MOPAR coil on the Jeep. I did re-check the primary and secondary resistance on the 1986 coil it is: the primary resistance is, 1.0 ohm and the secondary is 12.23 K ohms on both pins. I checked it because I wondered when the 1986 coil stopped firing the engine I wondered if the coil experienced a change, these are essentially the same numbers, my first readings were the same on the primary but the secondary was 12.29 K ohms, so there was a very minor difference. My graphic charts lists the spec for non-OEM as: .8-1.5 ohms for primary and 9.5-17.5 K ohms for the secondary.
The new OEM MOPAR coil has 1.0 ohm on the primary and 13.21 K ohms on the secondary, reads the same on both pins.The graphic I have on primary/secondary resistance testing states that the OEM specs should be .95-1.20 ohms and the secondary 11.3-15.3 K ohms.
I am not following what you mean about testing from the secondary to ground. Can you spell out in detail what you are recommending? Thank you for your time and patience.
Please Log in or Create an account to join the conversation.
- simclardy
-
- Offline
- Senior Member
-
- Posts: 78
- Thank you received: 7
If the tester flashes, do the test, but now with the tester in line with the destitute, does it flash? If yes, but the engine still will not run I would suspect something grounding, if it does not flash I would suspect an open or break.
I wish there was a better way to communicate. You will find the problem, it's not magic.
Ps depending on the spark tester it might not load the coil enough to simulate a spark plug firing under pressure. So I like to take my non led test light and clip one end to ground and put the probe to the high voltage cable or coil, then while it is cranking I will draw the probe out to see how big I can get the spark to jump. Carefull not to run the coil with nowhere for the spark to jump as it will jump internally and cause damage. Obviously if you can't pull a good half inch spark your coil is already shot.
Pps. This last test i learned from scanner danner, he has some good videos demonstrating this test.
Sent from my SM-G970U using Tapatalk
Please Log in or Create an account to join the conversation.
- mmorris923
-
Topic Author
- Offline
- Junior Member
-
- Posts: 35
- Thank you received: 1
I’m going to forward the link to this Forum, I’m hoping this will stimulate his thinking. Due to my lack of background knowledge, I need fairly detailed instructions to preform procedures. I’m no mechanic, prior to this problem my involvement was change the oil and spark plugs things like that. I’ve been learning a lot but I also know my limitations. I’m a retired pastor who is more comfortable swinging a hammer, building a home than turning a wrench on a car. I can’t begin to express how much I appreciate you suggestions and everyone’s willingness to help.
Please Log in or Create an account to join the conversation.
- simclardy
-
- Offline
- Senior Member
-
- Posts: 78
- Thank you received: 7
Sent from my SM-G970U using Tapatalk
Please Log in or Create an account to join the conversation.
- ferris48
-

- Offline
- Premium Member
-

- Posts: 129
- Thank you received: 47

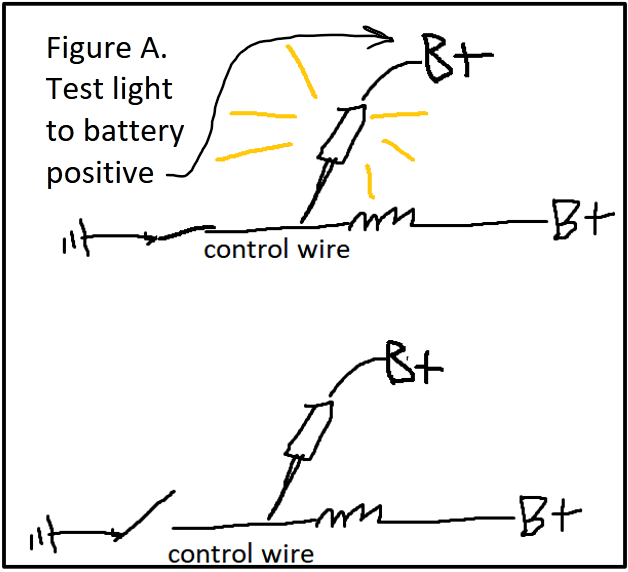
Figure A.
Test light to battery positive on the control wire, only tests the coil driver in the computer.
Imagine if the fuse is blown, or the positive wire's cut, or the coil is open circuit. A test light to battery positive on the control wire will still flicker.
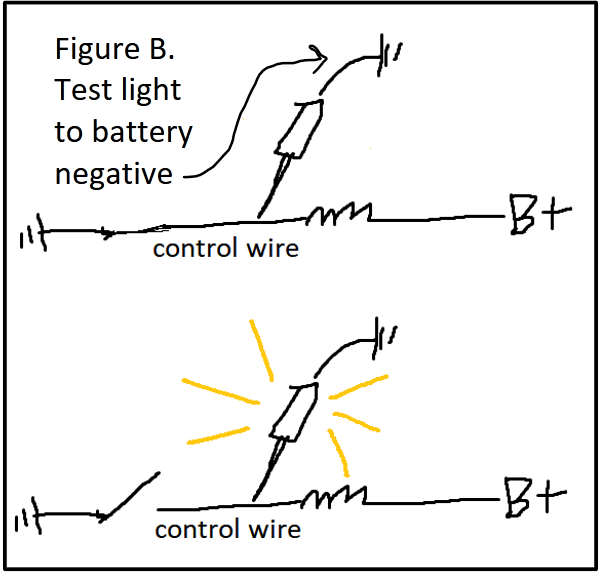
Figure B.
Test light to ground on the control wire, tests both the control and the battery feed through the coil primary.
When the computer grounds the control wire, the test light is connected to two grounds and the test light is off. When the computer releases the ground, the test light gets a positive, coming through a 1 ohm primary coil winding (low resistance, not dropping much voltage and lots of voltage left for the test light to function), and the test light turns on. The on/off of the test light suggests a working coil driver in the computer and a good power coming from the ASD relay through a fuse, through the coil connector, the coil primary and out the same connector and to the test light.
Since the voltage is only passing through a 1 ohm coil, the test light should be very bright, almost indistinguishable in brightness compared to a test light connected directly to the battery.
Please Log in or Create an account to join the conversation.
- simclardy
-
- Offline
- Senior Member
-
- Posts: 78
- Thank you received: 7
Sent from my SM-G970U using Tapatalk
Please Log in or Create an account to join the conversation.