Check Engine Light P2681 Chevy Volt - Need Expert Advice
- spgview
-
 Topic Author
- Offline
- New Member
-

- Posts: 11
- Thank you received: 1
having a hard time figuring out a short to open wire issue on a “coolant bypass valve 3-way” for a 2012 Chevy Volt.
have done the following:
1.replaced 3 way valve
2.Replaced and reprogrammed HPCM2 (K114B)
3. Tested continuity from connector to HPCM2 wires. No OL
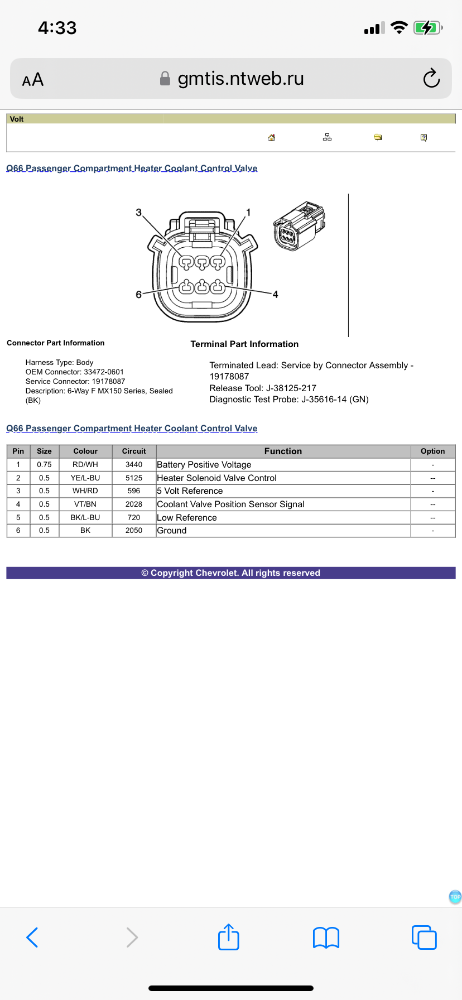
Pin 1 B+ power to Pin 6 Ground 12.8V
Pin 2 0.4 ohms (does this seems low?) not good connection to heater solenoid valve control
Pin 3 1.5 ohms 5 volt reference
Pin 4 1.3 ohms coolant valve position sensor signal
Pin 5 1.5 ohms low reference
Pin 6 Ground
Pin 1 battery positive voltage
My next step is to replaced (4 wires Pin2 to Pin 5) from HPCM2 Module to Connector Q66 Heater valve. I think Pin 2 might be the issues based on ohms but am really stumped.
if replacing these wires doesn’t resolve this, which 2 wires can I jumper to get rid of the check engine light long enough to run a drive cycle for smog? My check engine light is on and I need a smog soon.
any and all help is truly appreciated. It’s difficult finding someone that knows, tried posting at GM-Volt forum and am yet to get feedback.
Please Log in or Create an account to join the conversation.
- Tyler
-
- Offline
- Moderator
-

- Full time HACK since 2012
- Posts: 6120
- Thank you received: 1540
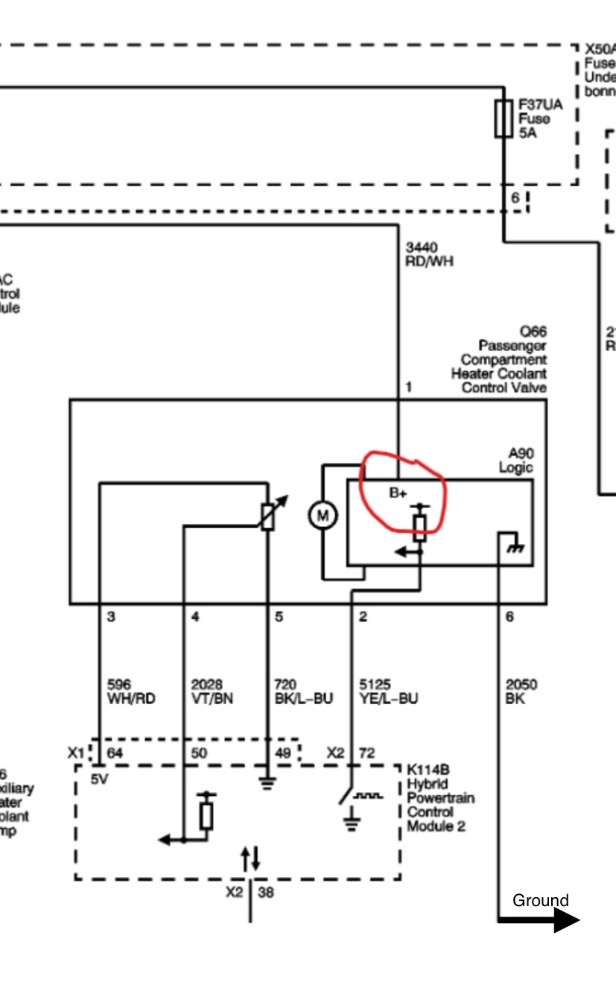
From reading service info, it sure seems like the HPCM2 is upset about what it's seeing on circuit #5125 (pin #2 at the heater valve). From SI:
Kinda vague, but we can work with that. I saw that you found .4 ohms on circuit #5125. Stands out a bit when compared to the feedback circuits, yeah, but still a good reading.The hybrid powertrain control module 2 has detected a short to voltage or an open on valve drive circuit.
I don't know exactly how tough it is to get to the heater valve connector, but my suggestion would be to measure voltage at pin #2 of the heater valve with the connector plugged in and in Service Mode. Backprobe pin #2 or pierce the wire and go over it with liquid electrical tape later. Depending on what you see at #2 at the heater valve will determine where to go next.
Alternately, there's a very specific test included in the manufacturer flow chart that may be worth doing:
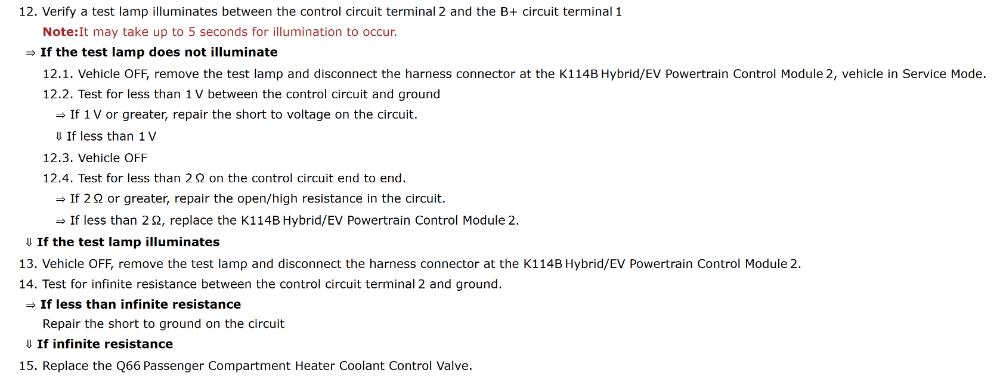
This is with the heater valve disconnected and HPCM2 connected, Service Mode. If I'm reading right, the test light should light up after five seconds. As long as circuit #5125 isn't shorted to ground, this would indicate a good working driver in the HPCM2. Both this test and the symbols in the wiring diagram both suggested that this a ground side switched driver.
If you haven't already, it'd also be good to check the heater valve for coolant inside the connector, which can cause a resistive short between pins. Also visually check for spread or pushed out pins, which would cause poor pin contact once the connector is plugged in.
From what I understand about how this heater valve works, jumping wires really won't be an option. You could probably find a way to temporarily fool the monitor for the valve control circuit, but then you'd run into other problems. From SI:if replacing these wires doesn’t resolve this, which 2 wires can I jumper to get rid of the check engine light long enough to run a drive cycle for smog? My check engine light is on and I need a smog soon.
That means, without a working valve control circuit, the valve learn will fail and you'll get either P26A3 or P26A5. Both of which will turn the MIL on, same as P2681.When the engine coolant temperature heats up, a valve learn procedure takes place. The hybrid powertrain control module 2 commands the valve to the link position and records the voltage coming back from the position sensor. Then the hybrid powertrain control module 2 commands the valve back to the bypass position and records the voltage coming back from the position sensor. The voltage values in both the link and bypass positions must fall within calibrated ranges.
Please Log in or Create an account to join the conversation.
- spgview
-
Topic Author
- Offline
- New Member
-
- Posts: 11
- Thank you received: 1
I’m working on replacing the connector/wiring to Q66.
Im splicing Pin 1 (B+ power) and Pin 6 (ground) at the valve connection as it’s to hard to trace. I can’t even locate the fuse for B+ power at the fuse box under the hood.
Initially, I had 12.8V power when probing pin 1 to 6. My assumption is these 2 wires are good(power/ground).
It took me awhile today to make a new MX150 connector(Q66 side) and run all new wires from the valve through the firewall and under the carpets to the HPCM2. I finally pierced by the hood patch to feed the wires through.
I ran all new wires for pins 2,3,4,5. Pin 1&6 is spliced into existing cables.
I’m still awaiting MX64 molex p/n 33468-0003 to make connections to the new wires.
If by chance this doesn’t work, and I have good ground (pin 6) and power (B+) pin 1. What would be my next steps?
Considering I replaced HPCM2 and Q66 Valve along with all new wires for pin2 through 5.
Appreciate the help, I’m hoping this resolves my issues. I will know more in 2-3days once these connectors arrive.
It’s too bad there wasn’t an easier solutions…
Please Log in or Create an account to join the conversation.
- spgview
-
Topic Author
- Offline
- New Member
-
- Posts: 11
- Thank you received: 1
So I replaced all new wires from the passenger compartment heater coolant control valve (Q66) to HPCM2 (K114B)
Pin 2 to Pin 72
Pin 3 to Pin 64
Pin 4 to Pin 50
Pin 5 to Pin 49
I spliced B+ power (pin 1) and ground (pin 6) at the heater coolant control valve.
I still have P2681 code present as a hard code. I reset it and it comes back on after turning the vehicle on and off.
Any additional suggestions?
Please Log in or Create an account to join the conversation.
- spgview
-
Topic Author
- Offline
- New Member
-
- Posts: 11
- Thank you received: 1
I have 12.6-8 V from B+ power(Pin 1) to Ground (Pin 6)
I replaced connections Pin 2-5 all new connections on both ends.
I double checked today if I was shorting any of the connections on the valve side and the wires at the HPCM2 to neighboring connections. All are OL.
If it’s not a defective valve, I’m truly stumped. I noticed that when I tried to perform the valve “learn” if would go to “normal” for 1 sec and stay at “bypass”.
Thoughts , suggestions?
Please Log in or Create an account to join the conversation.
- Tyler
-
- Offline
- Moderator
-
- Full time HACK since 2012
- Posts: 6120
- Thank you received: 1540
I plan to ordered an OEM GM 3-way valve.
What brand of valve did you use the first time?
Thoughts , suggestions?
See my post above.
Please Log in or Create an account to join the conversation.
- spgview
-
Topic Author
- Offline
- New Member
-
- Posts: 11
- Thank you received: 1
I plan to test it externally(coolant hoses not connected) with the 6-pin connector installed to determine if this will even resolve the check engine light.
Unsure if I missed something? Or what to perform next, do appreciate the help.
Please Log in or Create an account to join the conversation.
- ferris48
-

- Offline
- Premium Member
-

- Posts: 129
- Thank you received: 47
You've done resistance checks and changed wires but I'm not seeing a test you've done that has load tested the power or the ground.
The Q66 connector has got a full time power and ground going to it so unplug the electrical connector from the valve, and carefully front probe the power and the ground female terminals 1 and 6, respectively, with a headlight bulb.
If you're not squinting when that light's on then something's wrong with power or ground, good luck.
Please Log in or Create an account to join the conversation.
- spgview
-
Topic Author
- Offline
- New Member
-
- Posts: 11
- Thank you received: 1
yes, had to post on other sites to try and receive as much feedback to help me overcome this dilemma.
Another member on gm-volt is experiencing the same code. He replaced it under the circumstances of not having heat in electric mode then Installed an aftermarket valve like myself then received code P2681. Hopefully there is a correlation.
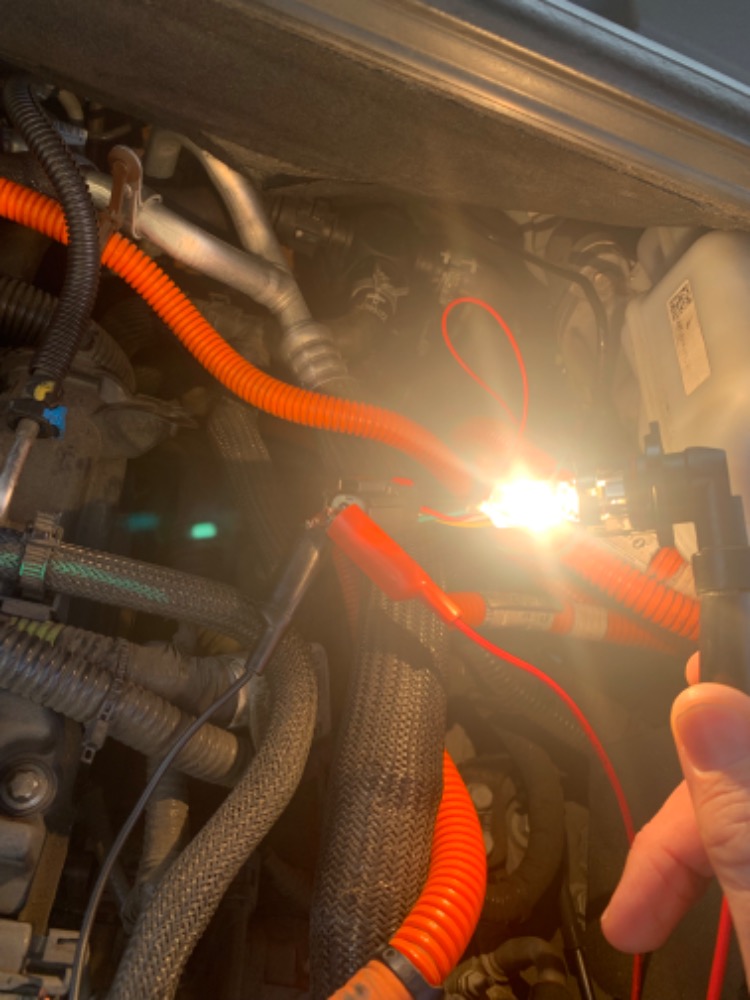
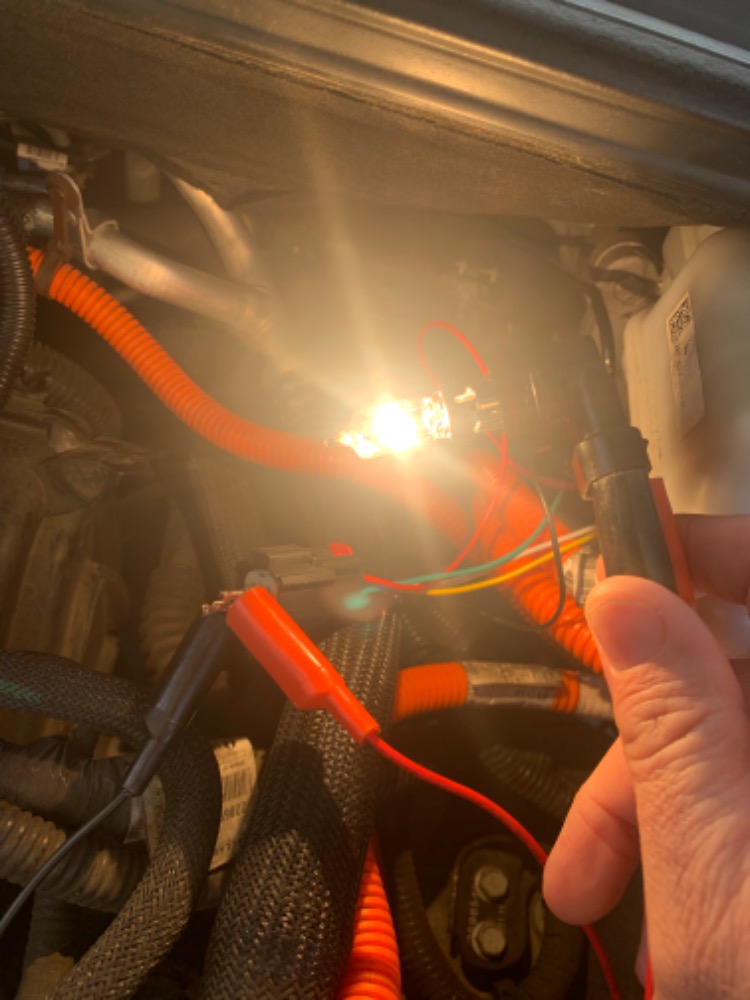
As you suggested after work, I ran test leads to B+ pin 1 then to Pin 6 Ground with a headlight bulb for a load. It appears to be really bright and hurts my eyes if I stare it. Here’s a few photos…
Please Log in or Create an account to join the conversation.
- ferris48
-
- Offline
- Premium Member
-
- Posts: 129
- Thank you received: 47
If this info's wrong, pull fuses til that bulb goes out I reckon.
Can you do Tyler's test next? I am curious to see what voltage is on this wire.
I don't know exactly how tough it is to get to the heater valve connector, but my suggestion would be to measure voltage at pin #2 of the heater valve with the connector plugged in and in Service Mode. Backprobe pin #2 or pierce the wire and go over it with liquid electrical tape later. Depending on what you see at #2 at the heater valve will determine where to go next.
Get a voltage measurement before you put it in service mode as well.
Please Log in or Create an account to join the conversation.
- ferris48
-
- Offline
- Premium Member
-
- Posts: 129
- Thank you received: 47
If the bulb lights up that means the wire and driver inside the HPCM2 is working and the odd man out would likely be the valve.
Please Log in or Create an account to join the conversation.
- ferris48
-
- Offline
- Premium Member
-
- Posts: 129
- Thank you received: 47
Please Log in or Create an account to join the conversation.
- spgview
-
Topic Author
- Offline
- New Member
-
- Posts: 11
- Thank you received: 1
Had a difficult time locating based on the electrical drawing at fuse boxes..
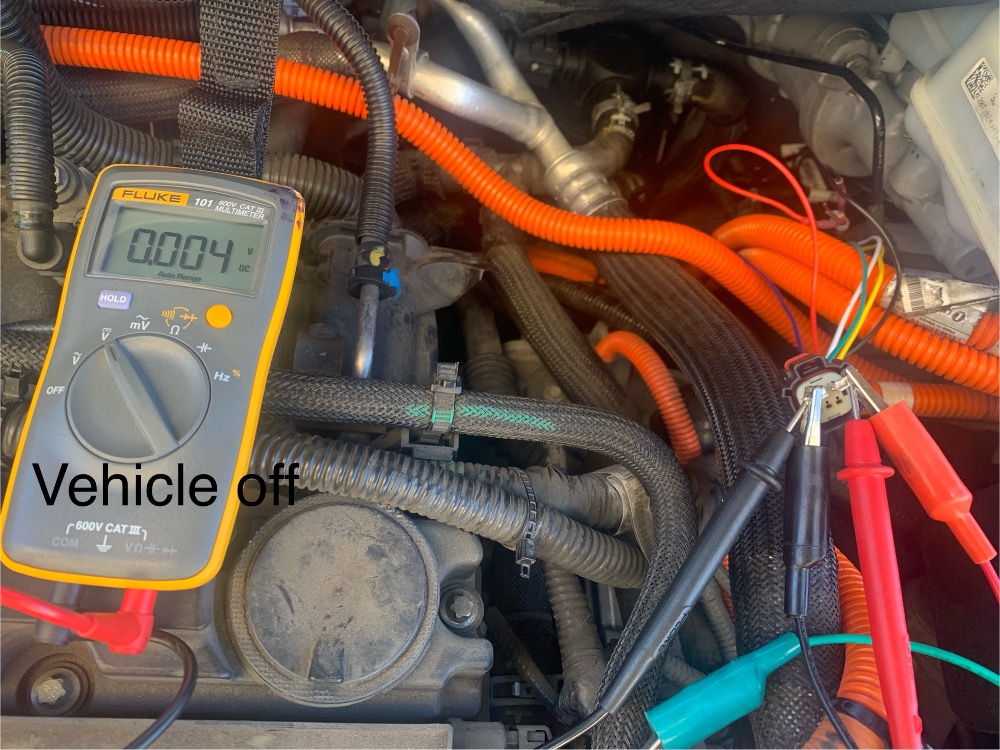
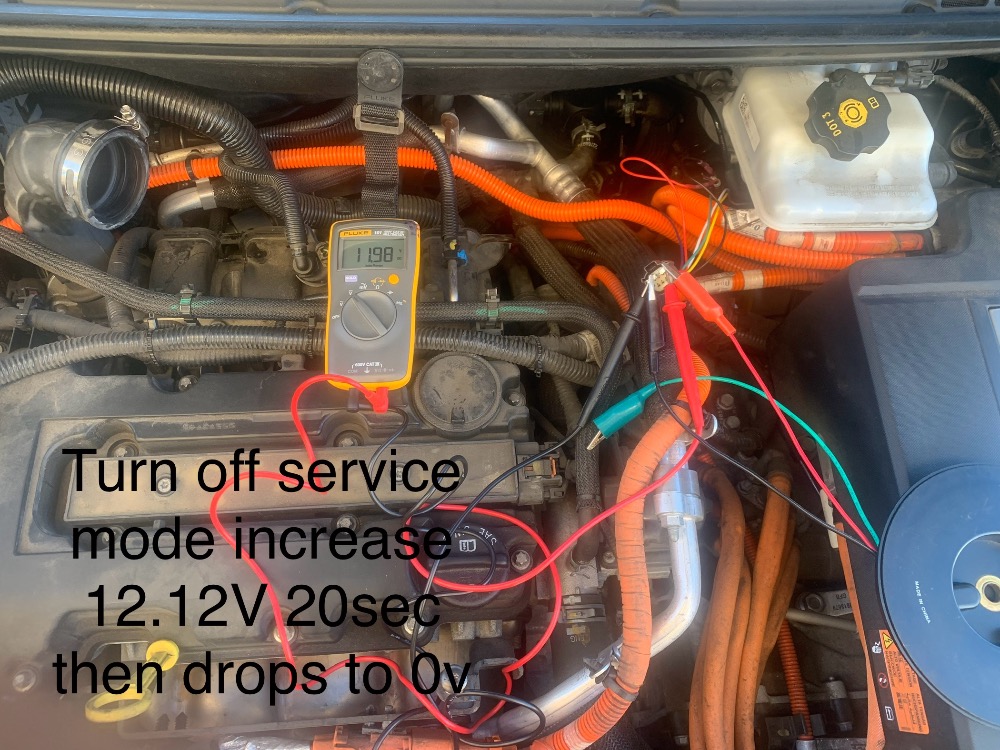
I forgot to perform this test Tyler recommended ,and did so today.
I disconnected the connector from the valve, used a volt meter at Q66.
Pin 1(B+ power) to pin 2 (5125 /Heater Solenoid Valve control)
Vehicle OFF : 0.04V
Vehicle in Service mode: 11.89V
Take vehicle out of service mode and gradually increases to 12.12V for 10-15sec and then drops to 0.04 V when entirely off.
defective valve ?
Please Log in or Create an account to join the conversation.
- spgview
-
Topic Author
- Offline
- New Member
-
- Posts: 11
- Thank you received: 1
Please Log in or Create an account to join the conversation.
- spgview
-
Topic Author
- Offline
- New Member
-
- Posts: 11
- Thank you received: 1
With the light bulb connected to Pin 1 & Pin 2 I had “no light”. Doubled checked power and was 11.78 V
I doubled checked the bulb to make sure I didn’t blown bulb; with constant power Pin 1 & Pin 6 constant ground and it was bright.
Based on the drawing/schematic, it appears pin 2 is switched ground at the hybrid power control module (HPCM2).
Lost daylight and plan to check resistance of the wire again tomorrow (Pin 2 to Pin 72 wire 5125)
Does this mean the connection is no good at the HPCM2? The wire is new and connectors are both been replaced.
All feedback is helpful, I feel like I’m now getting closer to a solution. Thanks all!
Please Log in or Create an account to join the conversation.
- ferris48
-
- Offline
- Premium Member
-
- Posts: 129
- Thank you received: 47
The headlight bulb not lighting is concerning. In hindsight I don't think it was wise for me to tell you to use a headlight bulb on a computer driver and I would have gone with a smaller bulb.
Hopefully the module had some protection from over current and if you could repeat the test you did in the last photo with the Fluke, we will know if the module is still okay. Additionally, put something between those two T-pins. If they touch eachother while the car enters service mode, that is a direct short to voltage which would be bad.
I can only speculate as to why the bulb did not light. Perhaps the HPCM2 didn't give it a full ground, to protect itself because it didn't like the current flow. Or perhaps a DTC prevented the HPCM2 from attempting to control the bulb, or maybe 5 seconds didn't elapse before you turned off service mode. Or worst case scenario - the headlight bulb killed the HPCM2 because I told you to use a bulb that draws too much current. For that, I am sorry.
If you're able to reproduce the experiment with your Fluke like in that last photo that would mean the HPCM2 is still alive, which is good news and if you're feeling up for the task, to do the bulb test again but with something that doesn't pull such a big load, like an incandescent test light, something in the 200 - 500 milliamp range perhaps.
Or if you wish to stop and await the arrival the the GM valve that's perfectly reasonable to me as well. Perhaps we can continue the diag if the code persists if you will still allow me to help you along.
Please Log in or Create an account to join the conversation.
- spgview
-
Topic Author
- Offline
- New Member
-
- Posts: 11
- Thank you received: 1
All test ran I ensured I was very careful on pin removal and install.
The GM valve should arrive Saturday.
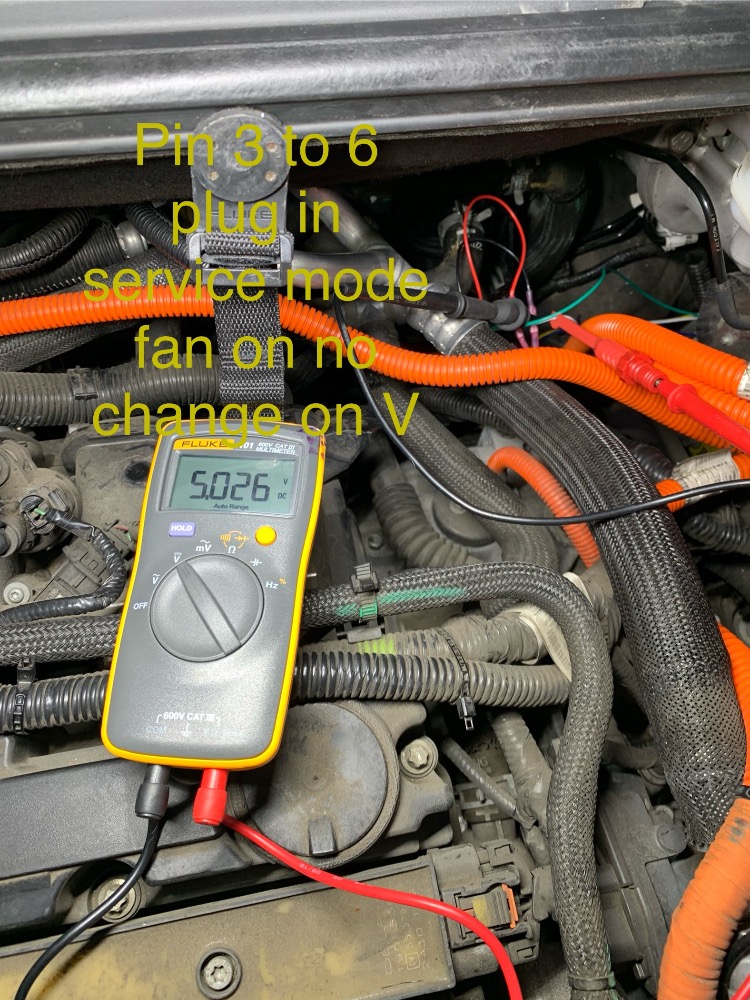
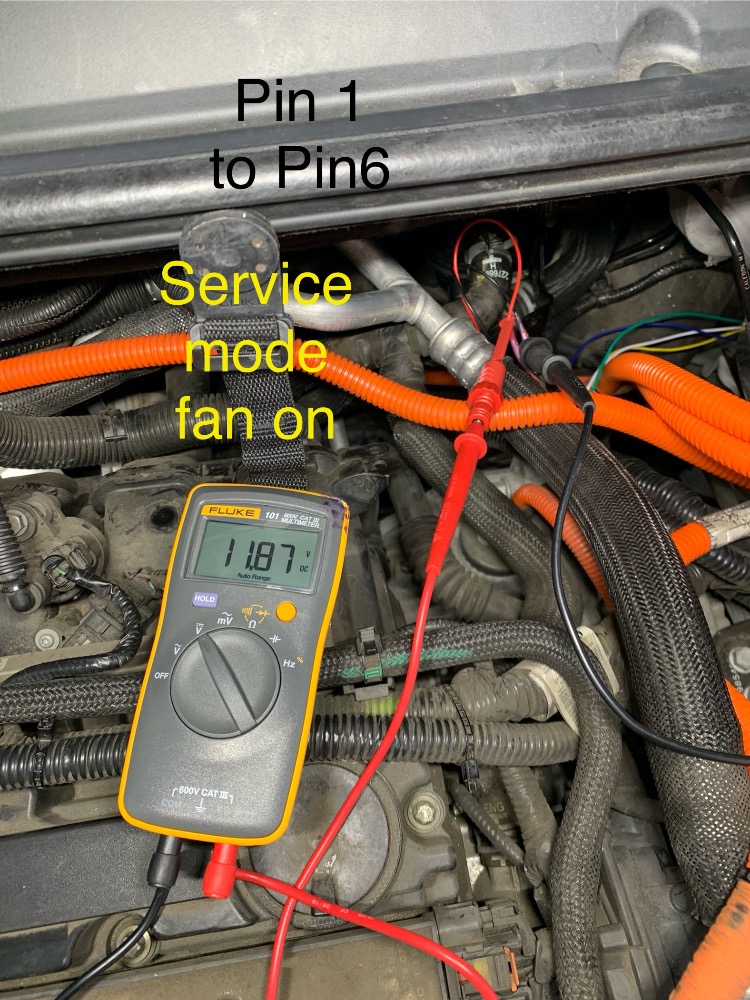
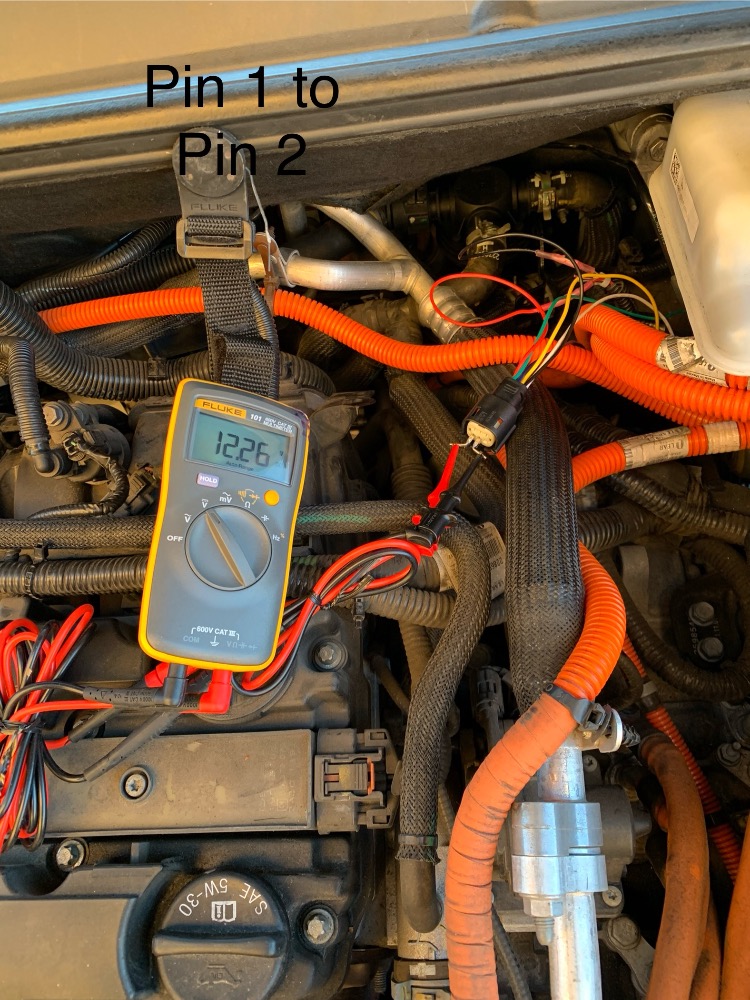
1. Pin 1 to Pin 2 and got 12.26V disconnected in service mode
2. Pin 1 B+ power to Pin 6 (ground) plugged in and backprobed 11.87 V
3. Pin 3 to Pin 6 in service mode plugged in 5.026
On some test, I turned on the heater/fan and back probed the voltage ; it did not reduce at all or produce the heat icon on the display (Pin 3 to 6 5v , Pin 1 to 6 11.87).
Can run more if needed, don’t mind checking thoroughly.
Please Log in or Create an account to join the conversation.
- Tyler
-
- Offline
- Moderator
-
- Full time HACK since 2012
- Posts: 6120
- Thank you received: 1540
I ran the additional test of with a load(light bulb) on Pin 1& Pin 2
With the light bulb connected to Pin 1 & Pin 2 I had “no light”. Doubled checked power and was 11.78 V
How long did you leave the light bulb installed between pin #1 and #2? Asking because service info specified that it may take up to five seconds for the bulb to illuminate. Were you in service mode?
Like ferris48, I'm also a little concerned about the use of the headlight bulb for that test. The HPCM2 driver probably isn't designed to carry the 3-4A of current that bulb will draw. That doesn't mean damage happened, necessarily. I'm just not sure it's a valid test with that bulb.
Service info for your Volt specifies the use of the EL-35616-200 test lamp kit. From what I can tell, that's a normal incandescent test light. I don't own one, and I can't find any specs for current draw, but I'd guess it'll draw around 200 mA. You don't need the EL-35616 kit (I don't think they make them anymore), just something that draws a similar amount of current. Any of the OTC test lights you'll find on Amazon will be in that range.
I disconnected the connector from the valve, used a volt meter at Q66.
Pin 1(B+ power) to pin 2 (5125 /Heater Solenoid Valve control)
Vehicle OFF : 0.04V
Vehicle in Service mode: 11.89V
This is... good? But also backwards.

You did this test at least once after you installed the headlight across pin #1 and #2, right? That would suggest that the HPCM2 driver still works. Or, it suggests that HPCM2 is still trying, anyway.
It's Saturday now, so you're probably already installing the new valve.

Maybe consider taking some after readings if the new valve does work out? It's valuable for anyone else coming along later looking for help.
Please Log in or Create an account to join the conversation.
- spgview
-
Topic Author
- Offline
- New Member
-
- Posts: 11
- Thank you received: 1
I didn’t think to much about the amp draw and should have read further testing, luckily it didn’t affect or damage anything.
I’m happy to say the OEM GM part worked. I installed it after work today. Performed the valve learn procedure after installed, cleared all trouble codes and off on a test drive. No pending codes this far, so I imagine it was just a defective part.
On a side note:
Over this last week , I also reached out to Gates for technical support to supply “good” resistance values or specs to test the existing valve, while awaiting a GM part.
No help was supplied from Gates, so from now on I will not support their business and purchase their parts.
Here are the resistance values of my bad valve that I removed today, I’m unsure what is good or acceptable:
Pin 1 to Pin 6 4.09 ohms
Pin 1 to 2. OL
Pin 1 to 3. OL
Pin 1 to 4. OL
Pin 1 to 5. 10.53 ohms
Pin 2 to 3. OL
Pin 2 to 4. 356.7. Ohms
Pin 2 to 5. OL
Pin 2 to 6. OL
Pin 3 to 2. OL
Pin 3 to 4. OL
Pin 3 to 5. OL
Pin 3 to 6. OL
Pin 4 to 5. OL
Pin 4 to 6. OL
Pin 5 to 6. 6.72 Ohms
I didn’t have time to test the new valves resistance values, maybe others can provide their results as time evolves to see the differences, and update this post to give everyone valuable feedback for testing.
Thanks all for the help!
Please Log in or Create an account to join the conversation.
- ferris48
-
- Offline
- Premium Member
-
- Posts: 129
- Thank you received: 47
Voltage plus I believe that fluke of yours can display frequency and duty cycle. I am happy the new valve works and that headlight bulb didn't cook the driver.If the new one doesn't work, I'd still like to know the voltage on circuit #5125, valve and HPCM2 connected, in service mode.
Maybe consider taking some after readings if the new valve does work out? It's valuable for anyone else coming along later looking for help.
")
Please Log in or Create an account to join the conversation.