[FIXED] P0335 DTC Causing No Start
- Tyler
-
- Offline
- Moderator
-

- Full time HACK since 2012
- Posts: 6115
- Thank you received: 1539
scarney wrote: Got it, thanks Noah!
Tyler, I back probed the signal wire at the connector, and to a known good ground. I turn the key on and turned the engine at the crank pully. I did indeed see the meter from around 0.027V up to 4.99V. I don't know exactly how often I should see the switching occur. I took a video of my DVOM while I was turning the crank pulley, which I uploaded to YouTube here.. In short, I would see it switch maybe five or six times over 60 degrees of engine rotation, so the CKPS seems to be working fine to me. Any ideas? I'll test spark and injector pulse tomorrow and let you know. Thanks for all the help.
Steve
Oooh nice, thanks for the video!
") What engine do you have in this Elantra? I can try to look up a known good and see how frequently you should see transitions. But really, because it IS switching, I'd argue that the sensor itself is fine.
What engine do you have in this Elantra? I can try to look up a known good and see how frequently you should see transitions. But really, because it IS switching, I'd argue that the sensor itself is fine.Like Paul said, the CMP would be next, and spark/injector pulse to make sure we're on the right track with an input problem.
I also just wanted note that my power wire heading to the sensor is 12V. Have you ever seen the power at 12V while the signal is at 5V?
Yep! Some Hall effects are set up that way, nothing to worry about.
Please Log in or Create an account to join the conversation.
- scarney
-
 Topic Author
- Offline
- Senior Member
-

- Posts: 47
- Thank you received: 5
Here's where I am at with this one guys. I backprobed the CMPS signal wire at the connector while turning the engine over. My CMPS should go low at cylinder #1 TDC. However the signal was fixed high. I checked for a bad ground, which I didn't have, so I replaced the sensor. The signal was still fixed high, I checked for a bad ground again just in case my last test wasn't valid if the sensor never closed, no issues. I thought maybe I was just missing the signal as it went past TDC. I even turned the car over and observed the voltage drop to 4.6V, I thought it must be getting pulled low periodically.
I moved on and as Tyler suggested I checked for spark and fuel. I hooked a noid light up to each injector, each lit up. I checked for spark by pulling a wire and setting it near the block and observing it arc. As SD suggested I looked for a jumped timing belt. The timing belt was in time so I took off the valve cover to check the timing chain, which on my car ensures the two camshafts are in time. It was then I noticed a notch on the intake camshaft that should pull the CMPS signal low. I put the notch right in front of my CMPS, the signal was still fixed high. I remembered I really never tightened it the sensor. I looked for a torque spec, couldn't find one, so I just tightened it down a little bit. Voila, the signal went low. I turned the engine over a few times and each time the notch passed the CMPS, the signal went low. I put my old sensor back in to verify for sure that I had found the problem. Unfortunately, the bolt slipped as I was tightening it, and now cant be tightened very tight. I think the threads are damaged. It seems the sensor gets moved every so slightly after its tightened and is enough to affect proper operation of the sensor. I'm guessing the threads were damaged before, which is why I had the no start in the first place. I remember when I took my original CMPS off the first time, the bolt was pretty loose.
Any ideas on how to fix this. Its in a terrible spot to try to drill and retap, at least for my skill level. I would be nervous I would ruin the block. Are there mechanics that would come to fix the threads. Any ideas on pushing the sensor down without the bolt. Gotta keep fighting till I can get the car to start. Thanks for all the help guys. I really appreciate it.
Steve
Please Log in or Create an account to join the conversation.
- Andy.MacFadyen
-

- Offline
- Moderator
-
- Posts: 3357
- Thank you received: 1037
However as this thread isn't highly streesed or won't cause a wheel to fall off I would probably first try a short cut make an M6 stud up and use either Loctite permanent grade "Stud & Bearing Fit" or a good quailty epoxy adhesive (for example "Araldite") to restrain the stud. Allow the adhesive at least 12 or better 24 hours before putting a nut on and tightening fully.
" We're trying to plug a hole in the universe, what are you doing ?. "
(Walter Bishop Fringe TV show)
Please Log in or Create an account to join the conversation.
- ScannerDanner
-

- Away
- Administrator
-

- Religion says do, Jesus says done!
- Posts: 975
- Thank you received: 500

Don't be a parts changer!
Please Log in or Create an account to join the conversation.
- ScannerDanner
-
- Away
- Administrator
-
- Religion says do, Jesus says done!
- Posts: 975
- Thank you received: 500
Don't be a parts changer!
Please Log in or Create an account to join the conversation.
- Tyler
-
- Offline
- Moderator
-
- Full time HACK since 2012
- Posts: 6115
- Thank you received: 1539
Seriously, well done. The thread damage sucks... Can you get a look at the threaded hole with a mirror? I'm wondering if the hole is threaded deeper than the bolt, and there are still good threads at the very bottom. If there are, then you could find a slightly longer bolt to reach them, and avoid having to do any thread repairs.If that won't work, then I say proceed as Andy suggested with the stud install. This is a fantastic idea, and allows for easy sensor removal later if needed. Like he said, the fact that this isn't a load bearing fastener is on your side in this situation.
scarney wrote: I moved on and as Tyler suggested I checked for spark and fuel. I hooked a noid light up to each injector, each lit up. I checked for spark by pulling a wire and setting it near the block and observing it arc.
I really hate to throw a wrench into the mix here, but your spark/injector pulse testing really surprised me. If there really was a CMP sensor issue, then I'd think there wouldn't be either one. :blink: Since you have both, then theoretically this engine should run with fuel (since you confirmed mechanical timing).
Maybe try starting the engine with carb clean in the intake at your next opportunity? That would support a fuel delivery problem. I'm concerned that the CMP thing is a red herring, and that there's another problem at work.
Please Log in or Create an account to join the conversation.
- scarney
-
Topic Author
- Offline
- Senior Member
-
- Posts: 47
- Thank you received: 5
I agree I am somewhat nervous since I never got a chance to start the engine and verify that this is my problem for sure. I was wondering if perhaps with the engine vibration the air gap may change and the sensor is sending the correct signal only intermittently. For now I know the threads need repaired, so I'm going to forge ahead with that first, then go from there.
In the meanwhile I ended up breaking off a bolt in there. I ordered a set of left hand drill bits, and I am looking for a small right angle drill. I don't think I will be able to get a regular drill in there. If I can get the bolt out, I am going to try putting a stud with loctite 272 on the threads, and use a nut to connect the sensor as Andy suggested. Thanks for all the help, I'll send out an update in a couple days.
Please Log in or Create an account to join the conversation.
- scarney
-
Topic Author
- Offline
- Senior Member
-
- Posts: 47
- Thank you received: 5
I was able to drill out the stuck bolt, install a stud with loctite 272, and reinstall the CMPS
") I torqued the nut to same value as the CKPS, since I couldn't find one for the CMPS, 90 in-lbs. I backprobed the signal wire and turned the engine by hand. The voltage now dropped low as expected. However, the car still doesn't start. Any ideas?
I torqued the nut to same value as the CKPS, since I couldn't find one for the CMPS, 90 in-lbs. I backprobed the signal wire and turned the engine by hand. The voltage now dropped low as expected. However, the car still doesn't start. Any ideas?Tyler, can you point me to a video or explain more what you mean by start the engine with carb cleaner. I'm guessing I remove the connector between the air filter and throttle body, open the throttle a bit, and spray some carb cleaner into the throttle body. How much I do need? Should I spray it while cranking the engine.
If I don't hear back from you, I'll try to get ahold of a pressure gauge and measure the fuel pressure instead to verify if there is a fuel delivery problem. Thanks for all the help.
Steve
Please Log in or Create an account to join the conversation.
- Tyler
-
- Offline
- Moderator
-
- Full time HACK since 2012
- Posts: 6115
- Thank you received: 1539
scarney wrote: I was able to drill out the stuck bolt, install a stud with loctite 272, and reinstall the CMPS
Well done! Seriously, thread repair is almost never a good time, so hats off to you for doing it right and not just gluing the sensor in the bore. :lol:
However, the car still doesn't start. Any ideas?
Tyler, can you point me to a video or explain more what you mean by start the engine with carb cleaner. I'm guessing I remove the connector between the air filter and throttle body, open the throttle a bit, and spray some carb cleaner into the throttle body. How much I do need? Should I spray it while cranking the engine.
Yep, you've got the right idea.
 It usually don't take much - one full second of spraying should be plenty.
I think this video demonstrates the test perfectly. Paul starts using carb clean into the throttle body at around nine minutes in. Or, watch the whole thing, it's a pretty good video overall.
")
If you start getting a reaction to the carb clean, then we're on the right track.
Please Log in or Create an account to join the conversation.
- scarney
-
Topic Author
- Offline
- Senior Member
-
- Posts: 47
- Thank you received: 5
I didn't really have much luck using the carb cleaner. I'm not sure if is the design of my car, or if it was something I did wrong. I did it the same way SD did it in the video you referenced. Actually, while the engine was turning over I opened the throttle plate, and a huge flame shot out back at me. Are you guys trying to kill me, lol. I did hear it maybe briefly try to start so I continued on with fuel delivery issues. I disconnected the line at the fuel rail and saw very little fuel leaking out. You need a special adapter for my car so I decided to risk it to save time. I placed the line into a small bucket and primed the pump, and even tried to start the car but I didn't get a drop of fuel from the line. I just need to determine now if it is the pump or some other electrical problem. I'll look through channel for some related videos, if you know of any offhand please post them.
I also found it interesting that I am no longer getting the P0335 code anymore after my thread repair. It seems like there was actually a problem there that I repaired, but it just wasn't the cause of my no start condition. Unless perhaps it just didn't trip the code this time. Ever heard of a bad fuel pump causing a P0335? Thanks again.
Steve
Please Log in or Create an account to join the conversation.
- Tyler
-
- Offline
- Moderator
-
- Full time HACK since 2012
- Posts: 6115
- Thank you received: 1539
scarney wrote: Hi Tyler,
I didn't really have much luck using the carb cleaner. I'm not sure if is the design of my car, or if it was something I did wrong. I did it the same way SD did it in the video you referenced. Actually, while the engine was turning over I opened the throttle plate, and a huge flame shot out back at me. Are you guys trying to kill me, lol.
:lol: I'm sorry about that! No, not trying to kill you, but I coulda warned you about that.
I did hear it maybe briefly try to start so I continued on with fuel delivery issues. I disconnected the line at the fuel rail and saw very little fuel leaking out. You need a special adapter for my car so I decided to risk it to save time. I placed the line into a small bucket and primed the pump, and even tried to start the car but I didn't get a drop of fuel from the line. I just need to determine now if it is the pump or some other electrical problem. I'll look through channel for some related videos, if you know of any offhand please post them.
Nice! Good move with taking the line off and directly checking for pressure - exactly what I would have done.
I can post the BBB Industries diagram, but it's very poorly photocopied and almost unreadable.
 Short story is that this fuel pump is fed power from the fuel pump relay, which is ground side controlled by the PCM. I dunno where the pump lives on this Elantra, and if there's a fuel pump access under the rear seat or not.
  If you can find the relay, cool, we can test there. But, if you have easy pump access, then that'd be preferable.
Let us know what you have to work with, and we can walk you through testing. These videos can give you an idea of what we're looking for:
Please Log in or Create an account to join the conversation.
- scarney
-
Topic Author
- Offline
- Senior Member
-
- Posts: 47
- Thank you received: 5
I found my fuel pump and got access to it. I only had to take off the back seat and a cover glued over top of the pump. There's two lines, I'm assuming one for sending fuel out and one for receiving fuel, and one connector with(I think, I kinda forget now) five pins. I bought a power probe today, I was going to just apply power directly to the pump. I'll watch the videos you referenced as well as what ground side switching means before I ask too many questions. I'll get in touch with you guys tomorrow.
Regarding the backfire, I was surprised because I thought the intake and exhaust valves would be closed when there was a spark, so I didn't think it could happen. But then I remembered on my Elantra there is a waste spark system, so I'm guessing that's the one that got me
Steve
Please Log in or Create an account to join the conversation.
- Tyler
-
- Offline
- Moderator
-
- Full time HACK since 2012
- Posts: 6115
- Thank you received: 1539
I can check the diagram tonight and let you know which pins out of the five are for the pump. It's likely that the others are for the fuel tank pressure sensor.The bigger of the lines is likely to be the fuel pressure line. Pretty sure this is a returnless system, so the other line is probably the EVAP vapor line.
Congrats on the Power Probe!
We can definitely use that to do our power/ground checks, or power the pump like you mentioned, once we figure out which pins are which. Please Log in or Create an account to join the conversation.
- Tyler
-
- Offline
- Moderator
-
- Full time HACK since 2012
- Posts: 6115
- Thank you received: 1539
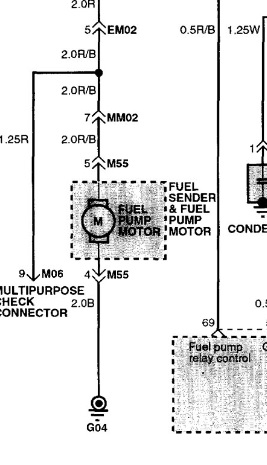
The pump wires are red/black (power) and black (ground), pins 4 and 5. With the engine cranking, you should see around 10V at at the red/black wire, and pretty much 0V on the black. If you have both and there's still no fuel, then stick a fork in the pump, 'cause it's done.
If you DON'T have power at the red/black, then you can attempt to power the pump manually with the PowerProbe. Just be double sure you're on the correct wire, and that the fuel line up at the engine is pointed into some kind of container.
If you now have fuel, then you can reconnect that line and see if you can make the engine run with the Probe powering the pump manually. Please Log in or Create an account to join the conversation.
- Tyler
-
- Offline
- Moderator
-
- Full time HACK since 2012
- Posts: 6115
- Thank you received: 1539
Please Log in or Create an account to join the conversation.
- scarney
-
Topic Author
- Offline
- Senior Member
-
- Posts: 47
- Thank you received: 5
I had to take a long hiatus from working on this car. This past Saturday I actually got a chance to put in a new fuel pump assembly and the car started right up. There were a few concerns that I have however. I am actually creating a new post right now with all the details. I just wanted to come back first and say thanks for all the help with this one.
Please Log in or Create an account to join the conversation.
- Tyler
-
- Offline
- Moderator
-
- Full time HACK since 2012
- Posts: 6115
- Thank you received: 1539
Fantastic to hear about the fix.
I'll be sure to check out the aftermath thread. Please Log in or Create an account to join the conversation.
- scarney
-
Topic Author
- Offline
- Senior Member
-
- Posts: 47
- Thank you received: 5
Please Log in or Create an account to join the conversation.